Getting Started with the PAX A920 & PAX A80

A920

A80
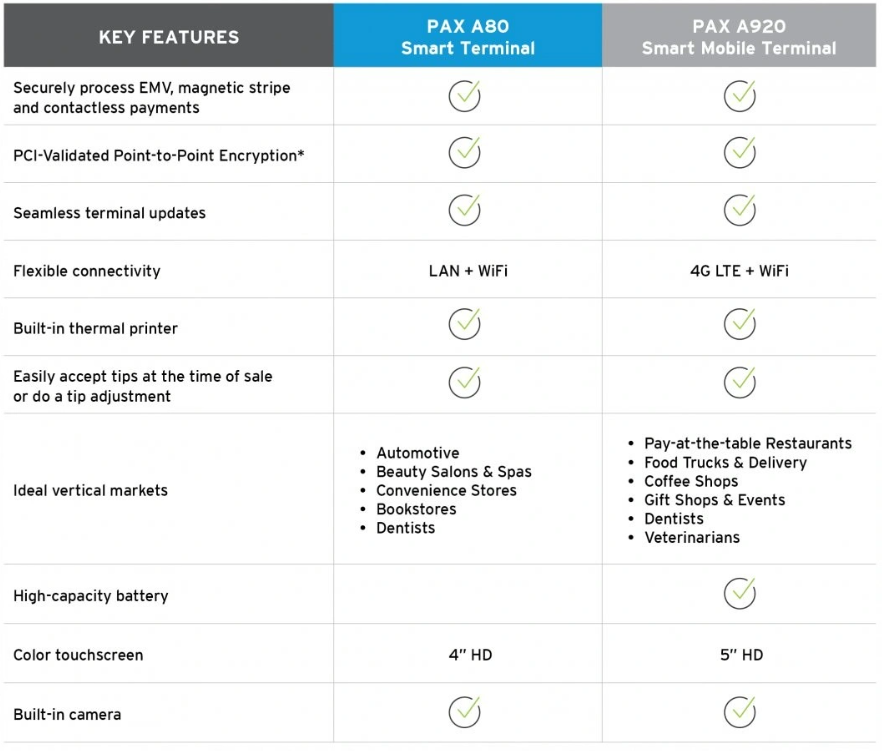
This PAX A Series Quick Reference Guide will help you with step-by-step instructions for basic transactions and functions.
PAX COUNTERTOP TERMINALS
Powered by Android
Supported by the PAXSTORE open software distribution platform, within which payment service providers create and manage their own independent app store marketplaces.
The PAX A Series is a new generation of terminals that function as a countertop device, packed with the latest PCI PTS 5.x and NFC contactless certifications and powered by the Android 6.0 operating
system.
With a full range of communication options to choose from, including Wi-Fi, Dial and Ethernet, and an optional back-up battery, the PAX A Series terminals are always connected, ensuring peak performance during business hours.
The PAX A Series terminals have a built-in camera and comes with a stunning high definition 4-inch touchscreen display which offers merchants and customers alike a graphical user interface way superior to traditional POS terminals.
ADDING SERVER/CLERK IDS

- Choose the FUNCTION option in the payment app.
- Choose the OPERATOR option in the function menu of the payment app.
- Enter in the password and press either the ENTER key on the screen OR the green button on the terminal keypad. The default password is the day’s date in mmddyyyy format.
- Press the option for ADD OPERATOR.

- Enter in the Operator Name (optional) and the Operator ID (required) Press the CONFIRM option on the screen.
- Press the OK option on the screen.
- Either enter in another OPERATOR ID OR press the BACK ARROW to return to the previous screen.
- To go back to the function menu in the payment app press the BACK ARROW. To view the operators choose the option for QUERY OPERATOR. To delete an operator choose the option for DELETE OPERATOR.
ACCESSING THE TERMINAL/ANDROID SETTINGS

- If you are in the payment application, choose the CIRCLE AT THE BOTTOM to return to the home menu.
- Once on the Android home screen choose the option for SETTINGS.
- The settings password is 9876 or in some cases 9876@@. Once that is keyed into the terminal press the OK on the terminal screen–the green keypad button will not work on this screen.
- Once in the settings menu scroll down and select DATE & TIME to access the date and time setting menu.
SETTING DATE & TIME

- The terminal will come with the auto time zone set to Eastern time zone and in Military time. Flag off AUTOMATIC TIME ZONE setting.
- Choose the SELECT TIME ZONE setting option to configure the merchant’s time zone.
- Scroll to find the merchant’s time zone and choose the option for the appropriate time zone.
SETTING WI-FI CONNECTION

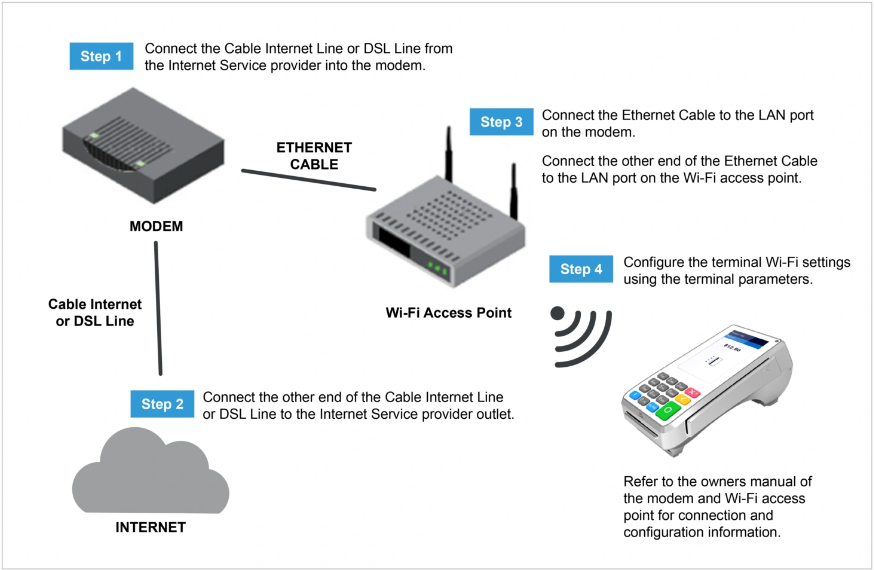
- Choose the WI-FI OPTION to set the Wi-Fi setup.
- Turn the WI-FI OPTION ON and then choose the network to connect to.
SETTING ETHERNET (A80 ONLY)

- Choose the ETHERNET OPTION to set the Ethernet setup.
- Turn the ETHERNET OPTION ON.
SETTING PASSWORD FOR TERMINAL/ANDROID

- Choose the PASSWORD setting to update the Password. Default password is 9876 or in some cases 9876@@, but it is recommended that you change the password and keep it in a secure place.
- If you turn this option OFF it will disable the password for the terminal/ android settings. Choose MODIFY PASSWORD option to change the terminal/android setting password.
- Enter the original password and then the new password you wish to set twice. Once entered press the OK button to complete update.
SETTING VOLUME & KEY BEEP

- Choose the SOUND & NOTIFICATION setting to update the volume and keypad beeps.
- This setting controls the NOTIFICATION VOLUME –notification can consist of application updates made to the payment app, and other app pushes made to the terminal. To turn off the keypad beeps flag the KEY TONE OPTION OFF.
CUSTOMIZING THE BATCH/DEFAULT REPORT

- Choose the FUNCTION option in the payment app.
- Choose the REPORTS option in the function menu of the payment app.
- Enter in the password and press either the ENTER key on the screen OR the green button on the terminal keypad. The default password is the day’s date in mmddyyyy format.
- To print the report that is set as the default report (set in the parameters of the file build) choose DEFAULT REPORT. To set some customized filters for the report choose CURRENT REPORT.

- Choose the REPORT TYPE and how you want the transactions on the report to be SORTED.
- Once the report type is chosen with the appropriate filters, choose the option for PRINT.
- To set this as the new Default report press OK. If you do not want this set as the default report and only wish to print, press the CANCEL option.
CREDIT SALE

- From the idle screen select the transaction type SALE.
- Please enter the sale amount and select CONFIRM.
- RESTAURANT ONLY: Enter the tip amount and select CONFIRM or enter 0 for no tip or select CONFIRM to bypass tip entry and add the tip later.
- Insert, swipe or manually enter the card number.

- RESTAURANT ONLY: Enter the Server ID and select CONFIRM
- Once card holder signs on the screen, select CONFIRM to accept or CLEAR to clear the signature and retry the signature.
- Select the PRINT button to print the receipts.
- Please remove the card.
- The terminal will display the transaction status.
CREDIT REFUND

- From the idle screen select the transaction type REFUND.
- Select how the terminal will apply the refund. Select BY CARD NUM to use the original card number or select RefNo to use the original transaction reference number.
- Enter the refund amount and select CONFIRM.
- Swipe or enter the card number.

- RESTAURANT ONLY: Enter the SERVER ID and select CONFIRM.
- Once card holder signs on the screen, select CONFIRM to accept or CLEAR to clear the signature and retry the signature.
- Select the PRINT button to print the receipts.
- The terminal will display the transaction status.
CREDIT VOID SALE

- From the idle screen select the transaction type VOID SALE.
- Swipe or enter the card number.
- Input the original transaction number and then select CONFIRM.
- Enter the Server ID and select CONFIRM.

- Select CONFIRM if the displayed transaction is the one to be voided. Scroll screen up to locate the confirm button.
- Once card holder signs on the screen, select CONFIRM to accept or CLEAR to clear the signature and retry the signature.
- Select the PRINT button to print the receipts.
- The terminal will display the transaction status.
FORCED SALE

- From the idle screen select the transaction type FORCED.
- Please enter the sale amount and select CONFIRM.
- Swipe or enter the card number.
- Enter the Auth Code of the original transaction and then select CONFIRM. Enter the Server ID and select CONFIRM.

- Once card holder signs on the screen, select CONFIRM to accept or CLEAR to clear the signature and retry the signature.
- Select the PRINT button to print the receipts.
- The terminal will display the transaction status.
CLOSE BATCH

- From the idle screen select the FUNC option. 5
- Select the BATCH option.
- When prompted “Close Batch?” select OK to close the batch or select CANCEL to stop the batch close.
- If prompted “Close W/Untipped?” select OK to zero out untipped transactions and close the batch or select CANCEL to stop the batch close.
- The terminal will display the batch close status.
REPRINT LAST

- From the idle screen select the FUNC option.
- Select the PRINT option.
- To reprint the last transaction, select the PRINT LAST option.
TIP ADJUSTMENT

- From the idle screen select the FUNC option.
- From the Func menu select the TIP MENU.
- From the Tip Menu select the desired search format. To search by operator ID select BY OPERATOR.
- Select the desired transaction.

- The transaction details will be displayed. Scroll the screen to display the Adjust option. To adjust the tip, select ADJUST.
- Enter the tip amount and select CONFIRM.
- To confirm the tip amount adjustment, select OK. To cancel the tip amount adjustment select CANCEL.
- The terminal will display the transaction status.
PAX A Series + Cash Discount
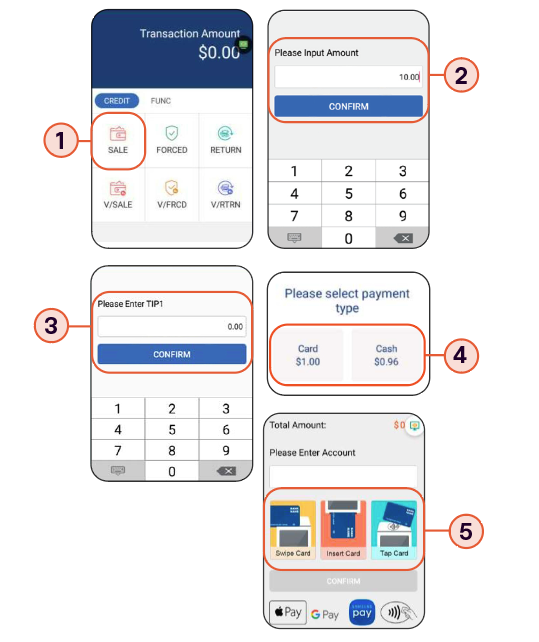
- From the idle screen select the transaction type SALE.
- Please enter the sale amount and select CONFIRM.
- RESTAURANT ONLY: Enter the tip amount and select CONFIRM or enter 0 for no tip or select CONFIRM to bypass tip entry and add the tip later.
- Select how the customer is paying CARD or CASH.
- Insert, swipe or manually enter the card number.
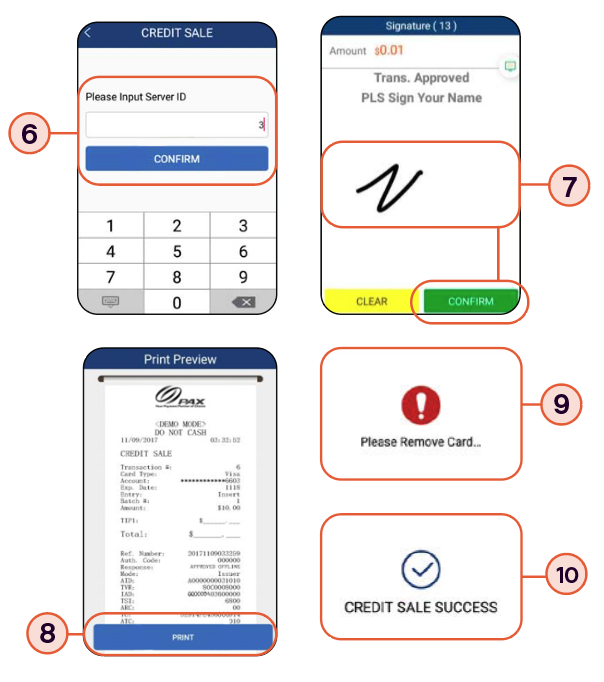
- RESTAURANT ONLY: Enter the SERVER ID and select CONFIRM.
- Once cardholder signs on the screen, select CONFIRM to accept or CLEAR to clear the signature and retry the signature.
- Select the PRINT button to print the receipts.
- The terminal will display the transaction status.
CREDIT REFUND
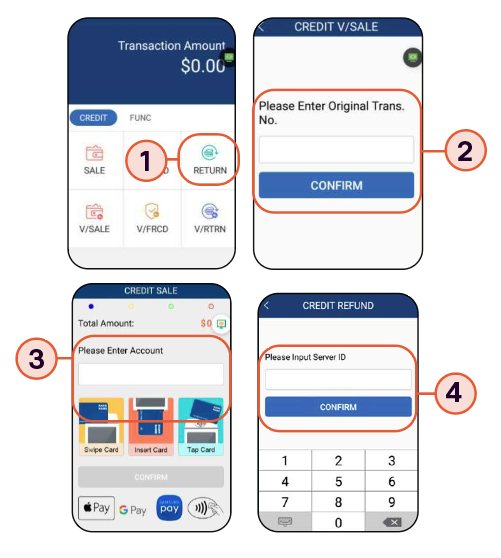
- From the idle screen select the transaction type RETURN.
- Enter the refund amount and select CONFIRM.
- Swipe or enter the card number.
- RESTAURANT ONLY: Enter the SERVER ID and select CONFIRM.
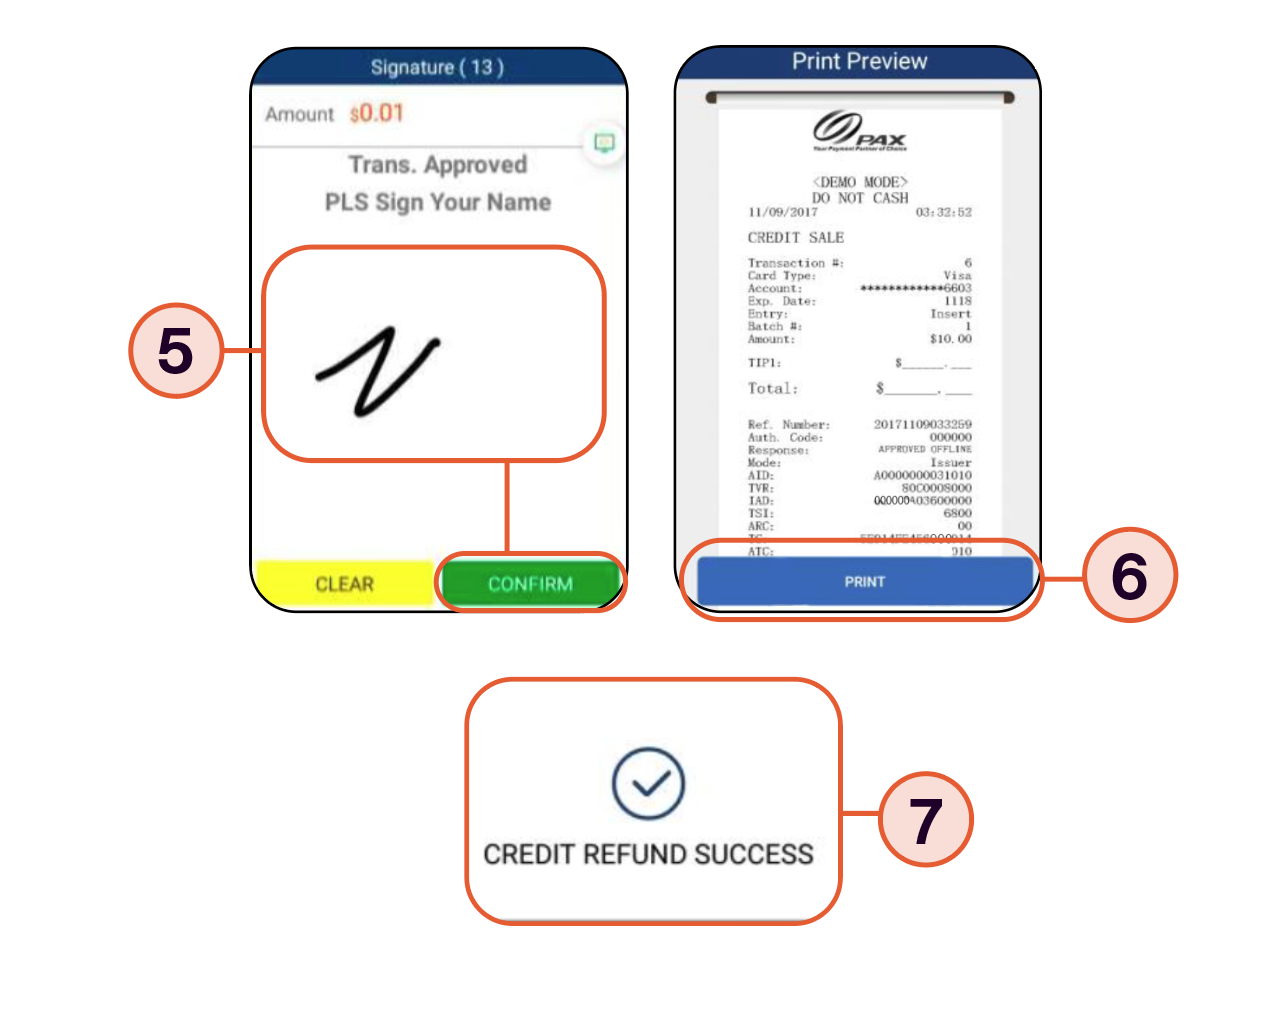
- Once cardholder signs on the screen, select CONFIRM to accept or CLEAR to clear the signature and retry the signature.
- Select the PRINT button to print the receipts.
- The terminal will display the transaction status.
CREDIT VOID SALE
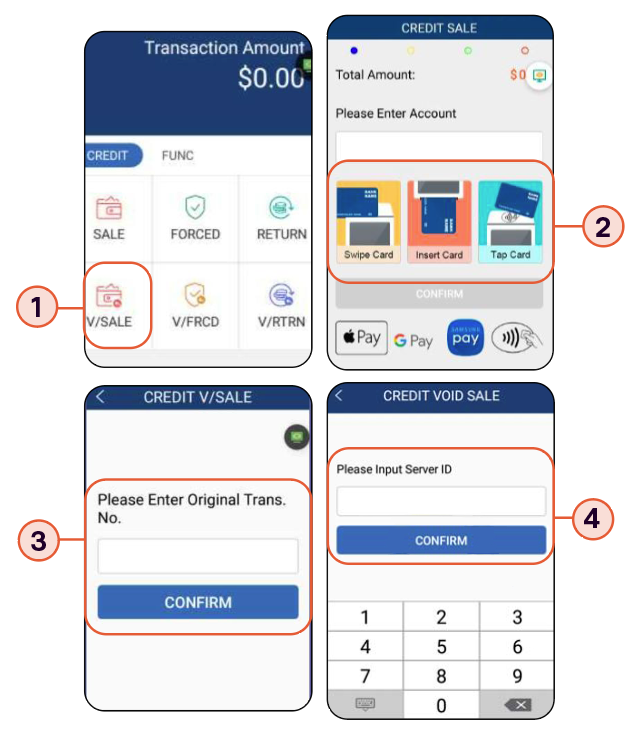
- From the idle screen select the transaction type VOID SALE.
- Swipe or enter the card number.
- Input the original transaction number and then select CONFIRM.
- Enter the Server ID and select CONFIRM.

- Select CONFIRM if the displayed transaction is the one to be voided. Scroll screen up to locate the confirm button.
- Once card holder signs on the screen, select CONFIRM to accept or CLEAR to clear the signature and retry the signature.
- Select the PRINT button to print the receipts.
- The terminal will display the transaction status.
TERMINAL & TECHNICAL SUPPORT
For questions about terminals and/or equipment:
Clearent Technical Support
866.435.0666 Option 1, then Option 2
7 a.m. – 11 p.m. Central, Monday through Sunday
technicalsupport@clearent.com
